
Overview:
As a software engineer, We all face some errors/exceptions while writing code! So what do we do when we face such a problem? If we are not sure, We google for solutions immediately. Don’t we? We google because we know that we would not be alone and someone would have already found the solution, for the problem we are facing now, which we could use to solve our problem.
Well, What to do if we face an issue in the high level software design – when connecting different classes / modules – when you have only a vague idea!! How can we google such things when we ourselves are not sure of the problem we have in the first place!!
No worries, You still have a solution!
Design patterns are the solutions for the problems which you might face in the software design!!
Design Patterns are well optimized and reusable solutions to a given problem in the software design. It helps us to show the relationship among the classes and the way in which they interact. Design pattern is a template which you have to carefully analyze and use it in appropriate places.
More information on design pattern can be found here.
Design Patterns in Test Automation:
As an automated test engineer, should we really care about design principles and patterns? Why do we need to learn/use Design Patterns in functional test automation?
After all, Test automation framework/automated test case is also a software which is used to test another software. So, we could apply the same design principles/patterns in our test automation design as well to come up with more elegant solution for any given design related problem in the test automation framework.
Remember that Design Patterns are NOT really mandatory. So you do not have to use them! But when you learn them, you would know exactly when to use! Basically these are all well tested solutions. So when you come across a problem while designing your framework/automated test cases, these design patterns could immediately help you by proving you a formula / template & saves us a lot of time and effort.
Note: Your aim should not be to implement a certain pattern in your framework. Instead, identify a problem in the framework and then recognize the pattern which could be used to solve the problem. Do not use any design pattern where it is not really required!!
In this article, We are going to see where we could use the Execute Around Pattern.
Udemy – Selenium WebDriver and Design Patterns Course:
VinsGuru has released a brand new course in Udemy on Selenium WebDriver and Design Patterns. ~8 hours course with all the important design patterns to design better, reusable page object models, test classes etc. Please access the above link which gives you the special discount. You can also get your money back if you do not like the course within 30 days.
Execute Around Pattern:
Execute Around pattern frees the user from calling certain steps which need to be executed before and after business logic. Here business logic could be any user action on a web page / web element.
For example: Let’s consider a button on a web page. Whenever you click on a button, it launches a new window. Now you need to take an action/verify some text on the new window. Once the action/verification is done, you close the ‘new window’.
- Click on a button on Page A.
- It launches new Window – Page B.
- Do a WebDriver switch to Page B.
- Take action on Page B.
- Do a WebDriver switch to Page A again.
Here, step 3 is required to take action on Page B. Similarly once the verification is done on Page B, you need to switch the driver back to Page A. Here the switch does not add any value to your tests. But they are required to take appropriate action on the page.
You might end up having tons of switch statements if you have to deal with multiple windows / frames in your test automation.
Lets see how we could leverage Execute Around Method pattern to simplify this.
Sample Application:
To explain things better, I am creating few dummy html pages as shown here.
- There is a main page which has links to launch others pages A, B and C in a separate windows.
- All these pages have some fields & Lets assume that we need to fill these fields.
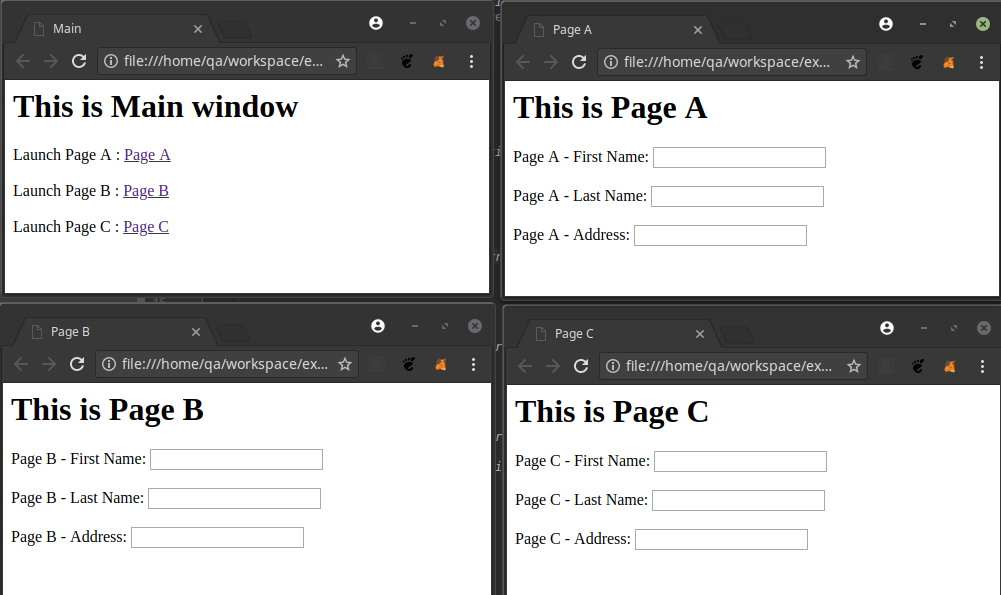
Main Page:
The page object for the above main page is as shown here.
public class MainPage {

    private final WebDriver driver;

    @FindBy(id = "pageA")
    private WebElement pageALink;

    @FindBy(id = "pageB")
    private WebElement pageBLink;

    @FindBy(id = "pageC")
    private WebElement pageCLink;


    public MainPage(final WebDriver driver){
        this.driver = driver;
        PageFactory.initElements(driver, this);
    }

    public void goTo(){
        this.driver.get("file:///home/vins/execute-around/main.html");
    }

    public void launchPageA(){
        this.pageALink.click();
    }

    public void launchPageB(){
        this.pageBLink.click();
    }

    public void launchPageC(){
        this.pageCLink.click();
    }

}
Window Annotation:
I am creating an annotation – the main idea here is to find the window based on the browser title.
import static java.lang.annotation.ElementType.TYPE;
import static java.lang.annotation.RetentionPolicy.RUNTIME;
import java.lang.annotation.Retention;
import java.lang.annotation.Target;


@Target({
        TYPE
}) @Retention(RUNTIME)
public @interface Window {
    String value() default "";
}
DriverUtil:
This DriverUtil class is responsible for switching to appropriate window based on the string we provide for the Window annotation.
public class DriverUtil {

    public static void switchToWindow(WebDriver driver, int index) {
        String handle = driver.getWindowHandles().toArray(new String[0])[index];
        driver.switchTo().window(handle);
    }

    public static void switchToWindow(WebDriver driver, Class<?> clazz) {
        String title = clazz.getAnnotation(Window.class).value();
        switchToWindow(driver, title);
    }

    private static void switchToWindow(final WebDriver driver, final String title){
        driver.getWindowHandles()
                .stream()
                .map(h -> driver.switchTo().window(h).getTitle())
                .filter(title::contains)
                .findFirst()
                .orElseThrow(() -> {
                    throw new RuntimeException("No Such Window");
                });
    }

}
Page A / B / C:
I create separate page objects for Page A, B and C as shown here.
@Window("Page A")
public class PageA {

    private final WebDriver driver;

    @FindBy(name="fn")
    private WebElement fn;

    @FindBy(name="ln")
    private WebElement ln;

    @FindBy(name="addr")
    private WebElement addr;

    public PageA(final WebDriver driver){
        this.driver = driver;
        PageFactory.initElements(driver, this);
    }

    //execute around method pattern
    public void onNewWindow(Consumer<PageA> consumer){
        DriverUtil.switchToWindow(driver, this.getClass());
        consumer.accept(this);
        DriverUtil.switchToWindow(driver, 0);
    }

    public void setFn(String val){
        fn.sendKeys(val);
    }

    public void setLn(String val){
        ln.sendKeys(val);
    }

    public void setAddr(String val){
        addr.sendKeys(val);
    }

}
Take a closer look at the onNewWindow method. Here PageA knows that it is a page object for a separate window which has the title as ‘Page A’. The user (the test classes), whoever is going to use this, would have to switch to its window to take action on this page. Once all the actions to be taken on this page are done, then it simply switches the user to the Main window. This is exactly what execute-around-method pattern describes. Execute Around pattern frees the user from calling certain steps which need to be executed before and after business logic.
Sample Test:
Lets create a simple test to test the workflow.
public class SwitchTest {

    private WebDriver driver;
    private MainPage mainPage;
    private PageA pageA;
    private PageB pageB;
    private PageC pageC;

    @BeforeTest
    public void init(){
        this.driver = DriverManager.getDriver();
        this.mainPage = new MainPage(driver);
        this.pageA = new PageA(driver);
        this.pageB = new PageB(driver);
        this.pageC = new PageC(driver);
    }

    @Test
    public void test(){
        this.mainPage.goTo();
        this.mainPage.launchPageA();
        this.mainPage.launchPageB();
        this.mainPage.launchPageC();

        this.pageA.onNewWindow(a -> {
            a.setFn("Test");
            a.setLn("Test");
            a.setAddr("Test");
        });

        this.pageB.onNewWindow(b -> {
            b.setFn("Automation");
            b.setLn("Automation");
            b.setAddr("Automation");
        });

        this.pageC.onNewWindow(c -> {
            c.setFn("Guru");
            c.setLn("Guru");
            c.setAddr("Guru");
        });

    }

    @AfterTest
    public void tearDown(){
        this.driver.quit();
    }
}
Lets see how it executes. Please note that I have included hard coded wait statements while running this test – so that we could see how the switch happens.
Lets see how the below test works.
this.mainPage.goTo();
this.mainPage.launcPageA();
this.mainPage.launcPageB();
this.mainPage.launcPageC();

this.pageA.onNewWindow(a -> {
    a.setFn("Test");
});

this.pageB.onNewWindow(b -> {
    b.setFn("Automation");
});

this.pageC.onNewWindow(c -> {
    c.setFn("Guru");
});

this.pageA.onNewWindow(a -> {
    a.setLn("Test");
});

this.pageB.onNewWindow(b -> {
    b.setLn("Automation");
});

this.pageC.onNewWindow(c -> {
    c.setLn("Guru");
});

this.pageA.onNewWindow(a -> {
    a.setAddr("Test");
});

this.pageB.onNewWindow(b -> {
    b.setAddr("Automation");
});

this.pageC.onNewWindow(c -> {
    c.setAddr("Guru");
});
As you could see, the test classes do not have to worry about switching to a specific window. They can call all the methods on the specific page object. Driver switch happens like magic behind the scenes. Switching window is handled before and after test actions are executed.
We could use the same pattern for handling with Frames in page objects as well.
Main Page with Frames:
<html>
<head><title>Main</title></head>
  <frameset cols="33%,33%,33%">
  <frame id="a" src="pageA.html">
  <frame id="b" src="pageB.html">
  <frame id="c" src="pageC.html">
</frameset>
</html>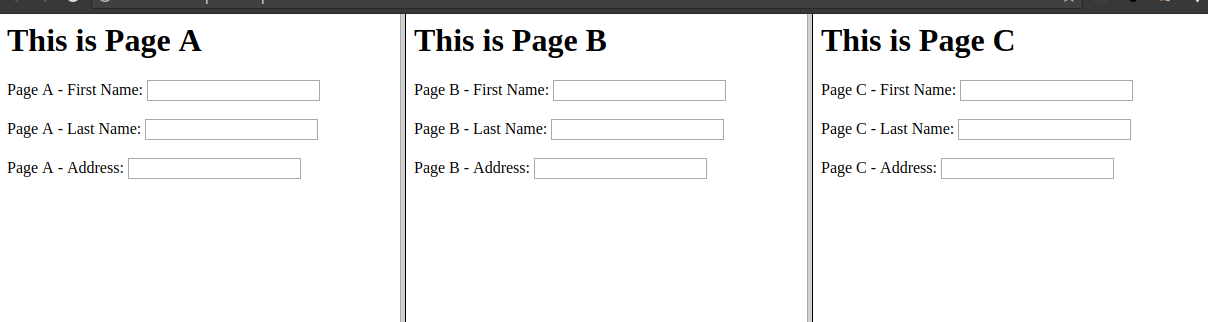
Main Page:
I modify the main page object as shown here.
public class MainPage {

    private final WebDriver driver;

    @FindBy(id = "a")
    private WebElement frameA;

    @FindBy(id = "b")
    private WebElement frameB;

    @FindBy(id = "c")
    private WebElement frameC;


    public MainPage(final WebDriver driver){
        this.driver = driver;
        PageFactory.initElements(driver, this);
    }

    public void goTo(){
        this.driver.get("file:///home/qa/workspace/execute-around/main.html");
    }

    public void onFrameA(Consumer<WebDriver> consumer){
        this.onFrame(consumer,frameA);
    }

    public void onFrameB(Consumer<WebDriver> consumer){
        this.onFrame(consumer,frameB);
    }

    public void onFrameC(Consumer<WebDriver> consumer){
        this.onFrame(consumer,frameC);
    }

    private void onFrame(Consumer<WebDriver> consumer, WebElement element){
        this.driver.switchTo().frame(element);
        consumer.accept(driver);
        this.driver.switchTo().defaultContent();
    }

}
The test is as shown here.
this.mainPage.goTo();

this.mainPage.onFrameA(frameA -> {
    frameA.findElement(By.name("fn")).sendKeys("test");
    frameA.findElement(By.name("ln")).sendKeys("automation");
    frameA.findElement(By.name("addr")).sendKeys("guru");
});

this.mainPage.onFrameB(frameB -> {
    frameB.findElement(By.name("fn")).sendKeys("test");
    frameB.findElement(By.name("ln")).sendKeys("automation");
    frameB.findElement(By.name("addr")).sendKeys("guru");
});

this.mainPage.onFrameC(frameC -> {
    frameC.findElement(By.name("fn")).sendKeys("test");
    frameC.findElement(By.name("ln")).sendKeys("automation");
    frameC.findElement(By.name("addr")).sendKeys("guru");
});
Lets execute the test and see how the driver switches to the frame.
Summary:
As you could see, execute around method pattern hides the complex logic of switching to frames / windows etc. The user does not have to worry about switching and instead just focuses on business logic. It makes both page objects and test classes look clean and neat.
Happy Testing & Subscribe 🙂
Nice post. The information you provide was really useful. Keep sharing this information.